March 20, 2025
Simplifying NetSuite CSV Imports: Tips for Accurate Data Handling
Simplifying NetSuite CSV Imports: Tips for Accurate Data Handling
By

Victoria Auyuanet
Last Modified Date:
Mar 20, 2025
Mar 20, 2025
We will outline the process and best practices for importing CSV (Comma-Separated Values) files containing NetSuite data. CSV imports are a powerful tool for efficiently transferring large volumes of data into NetSuite, allowing businesses to update records, add new entries, or migrate information from other systems.
Understanding the correct formatting, required fields, and potential pitfalls of CSV imports is crucial for maintaining data integrity. The following sections will guide you through preparing your CSV files, mapping fields, and executing successful imports to ensure accurate and efficient data transfer into NetSuite.
Prepare CSV File
Successful CSV imports into NetSuite begin with thorough preparation of the CSV file. Proper preparation ensures data accuracy, efficiency, consistency, and compliance with NetSuite’s requirements.
To achieve this, it is crucial to use the correct column headers and data types, include all mandatory fields, and adhere to NetSuite's date and number formats. Data should be cleansed to remove duplicates and validated for errors, missing values, and consistent entries. Accurate field mapping is essential, ensuring that CSV columns match the corresponding NetSuite fields, including any custom fields.
Effective preparation not only minimizes the risk of errors but also streamlines the import process, reducing the time and effort required to troubleshoot issues.
Before saving a spreadsheet as a CSV make sure that:
You’ve deleted empty columns.
All columns are in their correct format (specially numbers and dates).
All the mandatory fields (according to the form of your preference) are present in the file.
At least one identifier value is present in the file: internal id, external id or line id.
Importing Steps
Scan & Upload CSV File
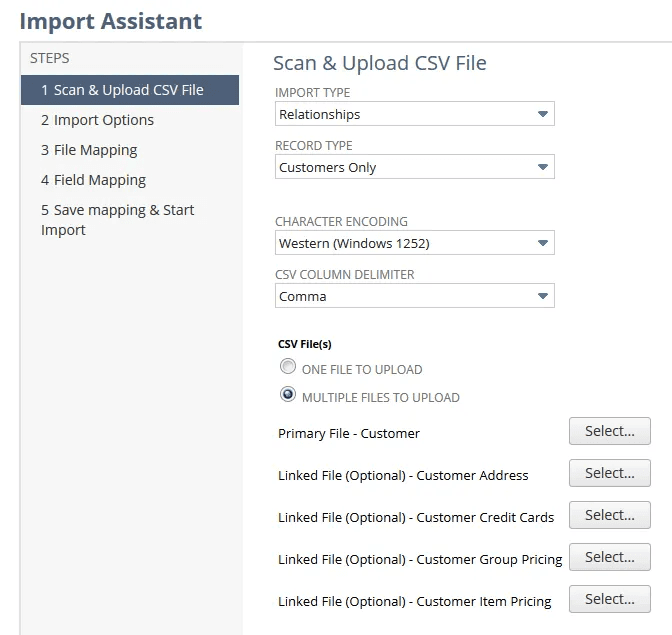
On the Scan & Upload CSV File page of the Import Assistant, you are able to select the category of record to import from the Import Type dropdown list.
Then you need to select the Character encoding and the column delimiter. Regarding this last one, CSV normally are separated by commas (”,”). However, NetSuite allows you to choose other character like semi coon (“;”).
The character encoding refers to the system used to represent characters in the CSV file. When importing CSV files into NetSuite, it is very important to use the correct character encoding to ensure that all data is accurately interpreted and displayed.
NetSuite typically supports UTF-8 encoding, which is a widely-used encoding format that can handle a vast range of characters from different languages. Using UTF-8 helps prevent issues related to special characters, symbols, and text in different languages.
Import options
This section provides several settings that dictate how data is handled during the import. It allows users to define specific parameters to ensure the import aligns with their needs.
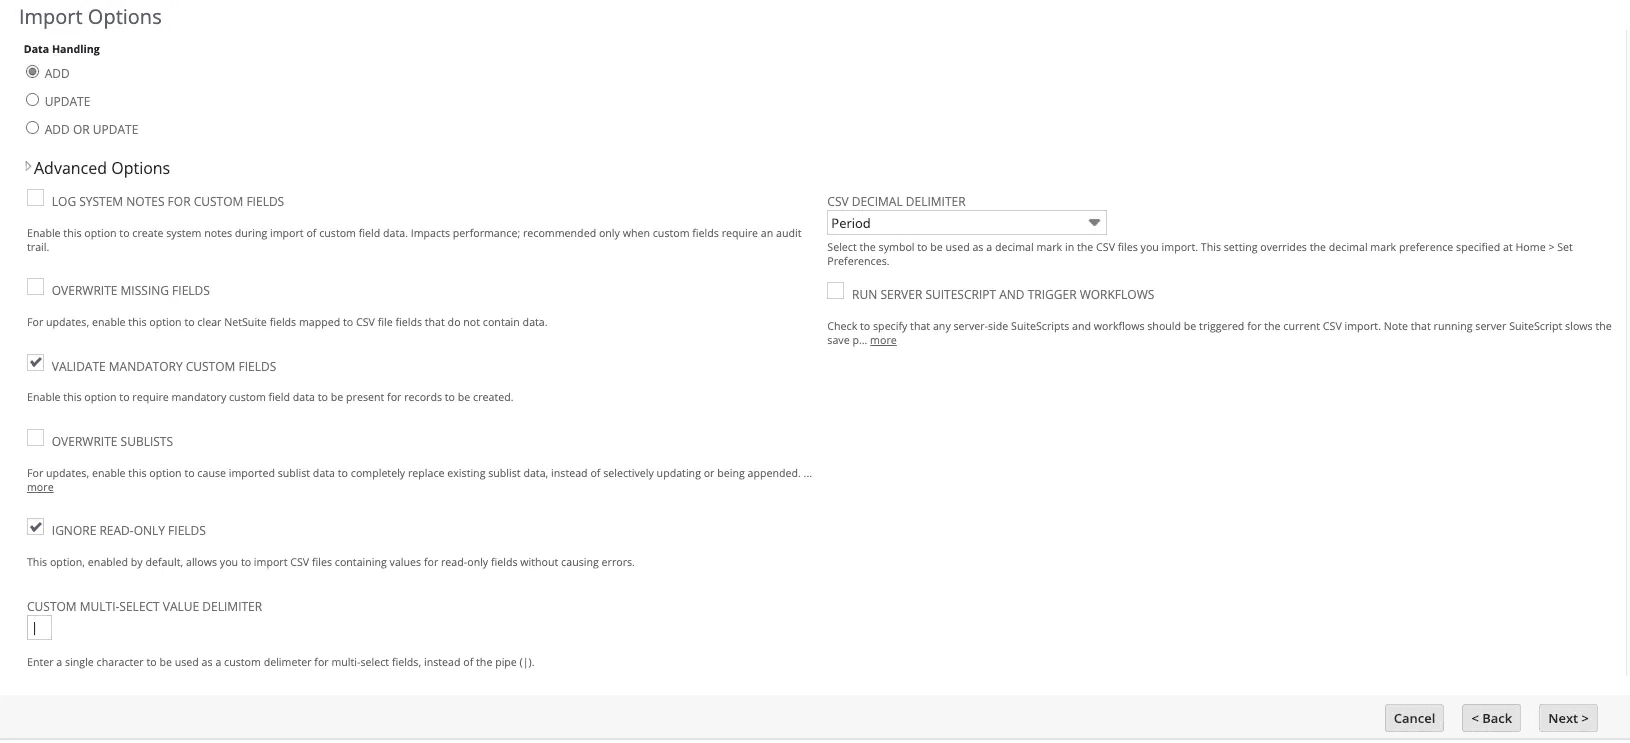
The most important option is Data Handling. Which allows you to choose whether add, update record, or both in one import. One good practice is to always add one identifier in order to avoid duplicates.
The advanced options offer additional controls to refine the import process:
Log System Notes for Custom Fields: This option, when enabled, logs changes made to custom fields during the import, providing an audit trail for future reference.
Overwrite Missing Fields: If selected, this setting allows the import to overwrite existing data with blank values from the CSV file where fields are missing.
Validate Mandatory Custom Fields: It ensures that all mandatory custom fields are validated during the import.
Overwrite Sublists: Enabling this option allows the import to overwrite existing sublist data (e.g., line items on transactions) with data from the CSV file.
Ignore Read-Only Fields: This option prevents the import process from attempting to update read-only fields.
Custom Multi-Select Value Delimiter: This field allows users to specify a custom delimiter for multi-select fields in the CSV file.
CSV Decimal Delimiter: Specifies the character used as the decimal separator in numeric fields within the CSV file. Users can choose between a period (.) or a comma (,) to match the format used in their data.
Run Server SuiteScript and Trigger Workflows: This option, when selected, ensures that any server-side SuiteScript and workflows associated with the records being imported are triggered. It is useful for maintaining automated processes and validations that are part of the organization's data management strategy.
File Mapping
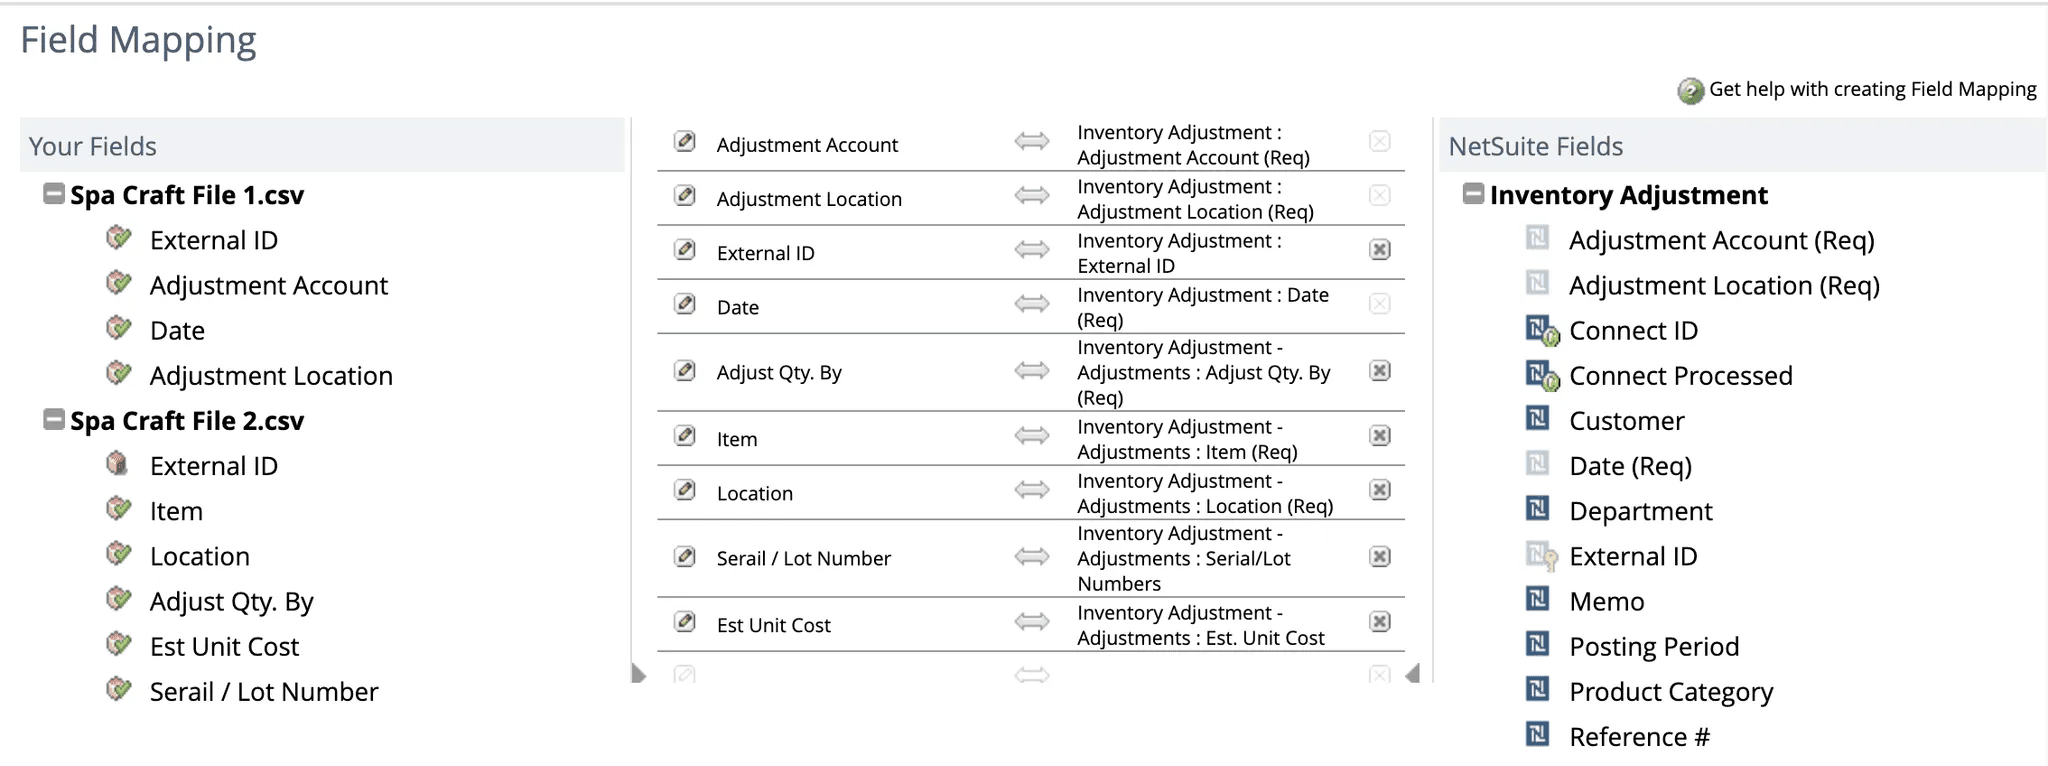
The File Mapping step is a crucial part of the CSV import process that requires careful attention. This is where you configure which columns in your CSV file correspond to specific body or line fields in NetSuite. Beyond simply mapping these columns, additional configurations can be made by clicking on the pencil icon next to each field.
When you click the pencil icon, a modal will appear, allowing you to set specific parameters for each field. For example, if you are mapping a column labeled "Item", you can choose whether to identify the item by its internal ID or by its name, depending on the data in your CSV file.
Save Mapping and Start Import
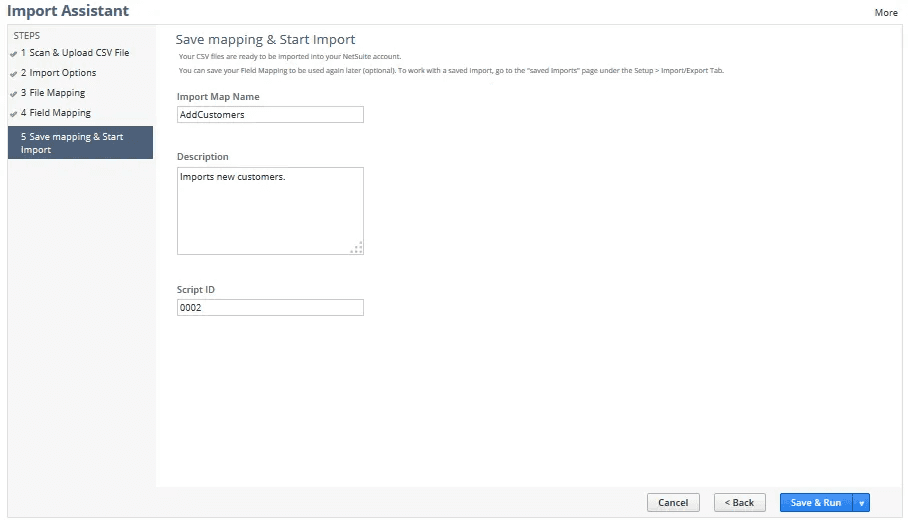
In step five of the Import Assistant, you need to complete some fields to finalize your import setup. First, enter a name in the Import Map Name field for easy reference when tracking the import's progress or if you need to re-run or edit the import later. Optionally, provide a description for this import. In the Script ID field, assign a unique ID for referencing the saved import mapping in SuiteScript.
Once these details are set, choose one of the following options:
Save: to store the settings without starting the import job.
Run: to start the import job immediately without saving the previous settings.
Save & Run: to save and start the import job.
Save As: to save this settings separately and under a different name.
Save As & Run: to save the settings separately under a different name and start the import job.
It is recommended to start with files containing only a few lines to set up the mapping and import settings correctly. This approach allows you to configure and test the import process with a small dataset first, ensuring everything is set up properly. By verifying the final result on a limited number of records, you can identify and correct any issues before performing a large-scale import, thereby avoiding extensive corrections later on.
Results Analysis
After completing the import setup and clicking a button to proceed, the Finished page appears. Here, you have several options to manage and review your imports. You can click Import Job Status to review the status of this and other imports (note that this option is not available if you saved the import without running it). For more details, refer to Checking CSV Import Status. You can also click View Saved Imports to see a list of saved imports or start an import job based on one of those imports. For further information, see Working with Saved CSV Imports. Additionally, you can click Share Import to open a dialog where you can share the import with other users, as explained in Sharing Imports. Lastly, the Start Another Import option allows you to launch the Assistant and initiate a new import.
Once you select the option to run an import, the job is placed in a queue for processing. Each company has its own work queue for CSV imports. If no other jobs are in the queue, the import is processed immediately. If other jobs are ahead, the new import job will be in a pending status until the others are processed. You can cancel a job while it is pending or being processed. To speed up processing time, it is recommended to break large jobs into smaller chunks, with a limit of 25,000 records per file.
Check NetSuite Results
To check the results of your CSV import, NetSuite generates detailed error messages and logs that help identify any issues that occurred during the import process. You can access these results by navigating to the Import Job Status page, where you can review the status and any errors associated with your import job. NetSuite provides specific error messages that pinpoint the problematic fields and records, making it easier to address and correct the issues.
Verify Data by Comparing
After identifying the errors, it is recommended to compare the original CSV file with the imported data. Using Excel, you can employ formulas to cross-check and validate the data. For instance, you can use the VLOOKUP function to compare original and imported/updated values, ensuring accuracy and consistency. This methodical approach helps you quickly spot discrepancies and make necessary corrections before re-importing the data, thereby maintaining the integrity of your NetSuite database.
To ensure a smooth and successful CSV import process into NetSuite, follow these best practices and steps carefully. If you need expert assistance with your CSV imports or any other NetSuite-related services, BrokenRubik has the experience and professionals to help you streamline and customize your operations.
Ready to take your NetSuite processes to the next level? Contact us today, and let’s work together to achieve your business goals!
We will outline the process and best practices for importing CSV (Comma-Separated Values) files containing NetSuite data. CSV imports are a powerful tool for efficiently transferring large volumes of data into NetSuite, allowing businesses to update records, add new entries, or migrate information from other systems.
Understanding the correct formatting, required fields, and potential pitfalls of CSV imports is crucial for maintaining data integrity. The following sections will guide you through preparing your CSV files, mapping fields, and executing successful imports to ensure accurate and efficient data transfer into NetSuite.
Prepare CSV File
Successful CSV imports into NetSuite begin with thorough preparation of the CSV file. Proper preparation ensures data accuracy, efficiency, consistency, and compliance with NetSuite’s requirements.
To achieve this, it is crucial to use the correct column headers and data types, include all mandatory fields, and adhere to NetSuite's date and number formats. Data should be cleansed to remove duplicates and validated for errors, missing values, and consistent entries. Accurate field mapping is essential, ensuring that CSV columns match the corresponding NetSuite fields, including any custom fields.
Effective preparation not only minimizes the risk of errors but also streamlines the import process, reducing the time and effort required to troubleshoot issues.
Before saving a spreadsheet as a CSV make sure that:
You’ve deleted empty columns.
All columns are in their correct format (specially numbers and dates).
All the mandatory fields (according to the form of your preference) are present in the file.
At least one identifier value is present in the file: internal id, external id or line id.
Importing Steps
Scan & Upload CSV File
On the Scan & Upload CSV File page of the Import Assistant, you are able to select the category of record to import from the Import Type dropdown list.
Then you need to select the Character encoding and the column delimiter. Regarding this last one, CSV normally are separated by commas (”,”). However, NetSuite allows you to choose other character like semi coon (“;”).
The character encoding refers to the system used to represent characters in the CSV file. When importing CSV files into NetSuite, it is very important to use the correct character encoding to ensure that all data is accurately interpreted and displayed.
NetSuite typically supports UTF-8 encoding, which is a widely-used encoding format that can handle a vast range of characters from different languages. Using UTF-8 helps prevent issues related to special characters, symbols, and text in different languages.
Import options
This section provides several settings that dictate how data is handled during the import. It allows users to define specific parameters to ensure the import aligns with their needs.
The most important option is Data Handling. Which allows you to choose whether add, update record, or both in one import. One good practice is to always add one identifier in order to avoid duplicates.
The advanced options offer additional controls to refine the import process:
Log System Notes for Custom Fields: This option, when enabled, logs changes made to custom fields during the import, providing an audit trail for future reference.
Overwrite Missing Fields: If selected, this setting allows the import to overwrite existing data with blank values from the CSV file where fields are missing.
Validate Mandatory Custom Fields: It ensures that all mandatory custom fields are validated during the import.
Overwrite Sublists: Enabling this option allows the import to overwrite existing sublist data (e.g., line items on transactions) with data from the CSV file.
Ignore Read-Only Fields: This option prevents the import process from attempting to update read-only fields.
Custom Multi-Select Value Delimiter: This field allows users to specify a custom delimiter for multi-select fields in the CSV file.
CSV Decimal Delimiter: Specifies the character used as the decimal separator in numeric fields within the CSV file. Users can choose between a period (.) or a comma (,) to match the format used in their data.
Run Server SuiteScript and Trigger Workflows: This option, when selected, ensures that any server-side SuiteScript and workflows associated with the records being imported are triggered. It is useful for maintaining automated processes and validations that are part of the organization's data management strategy.
File Mapping
The File Mapping step is a crucial part of the CSV import process that requires careful attention. This is where you configure which columns in your CSV file correspond to specific body or line fields in NetSuite. Beyond simply mapping these columns, additional configurations can be made by clicking on the pencil icon next to each field.
When you click the pencil icon, a modal will appear, allowing you to set specific parameters for each field. For example, if you are mapping a column labeled "Item", you can choose whether to identify the item by its internal ID or by its name, depending on the data in your CSV file.
Save Mapping and Start Import
In step five of the Import Assistant, you need to complete some fields to finalize your import setup. First, enter a name in the Import Map Name field for easy reference when tracking the import's progress or if you need to re-run or edit the import later. Optionally, provide a description for this import. In the Script ID field, assign a unique ID for referencing the saved import mapping in SuiteScript.
Once these details are set, choose one of the following options:
Save: to store the settings without starting the import job.
Run: to start the import job immediately without saving the previous settings.
Save & Run: to save and start the import job.
Save As: to save this settings separately and under a different name.
Save As & Run: to save the settings separately under a different name and start the import job.
It is recommended to start with files containing only a few lines to set up the mapping and import settings correctly. This approach allows you to configure and test the import process with a small dataset first, ensuring everything is set up properly. By verifying the final result on a limited number of records, you can identify and correct any issues before performing a large-scale import, thereby avoiding extensive corrections later on.
Results Analysis
After completing the import setup and clicking a button to proceed, the Finished page appears. Here, you have several options to manage and review your imports. You can click Import Job Status to review the status of this and other imports (note that this option is not available if you saved the import without running it). For more details, refer to Checking CSV Import Status. You can also click View Saved Imports to see a list of saved imports or start an import job based on one of those imports. For further information, see Working with Saved CSV Imports. Additionally, you can click Share Import to open a dialog where you can share the import with other users, as explained in Sharing Imports. Lastly, the Start Another Import option allows you to launch the Assistant and initiate a new import.
Once you select the option to run an import, the job is placed in a queue for processing. Each company has its own work queue for CSV imports. If no other jobs are in the queue, the import is processed immediately. If other jobs are ahead, the new import job will be in a pending status until the others are processed. You can cancel a job while it is pending or being processed. To speed up processing time, it is recommended to break large jobs into smaller chunks, with a limit of 25,000 records per file.
Check NetSuite Results
To check the results of your CSV import, NetSuite generates detailed error messages and logs that help identify any issues that occurred during the import process. You can access these results by navigating to the Import Job Status page, where you can review the status and any errors associated with your import job. NetSuite provides specific error messages that pinpoint the problematic fields and records, making it easier to address and correct the issues.
Verify Data by Comparing
After identifying the errors, it is recommended to compare the original CSV file with the imported data. Using Excel, you can employ formulas to cross-check and validate the data. For instance, you can use the VLOOKUP function to compare original and imported/updated values, ensuring accuracy and consistency. This methodical approach helps you quickly spot discrepancies and make necessary corrections before re-importing the data, thereby maintaining the integrity of your NetSuite database.
To ensure a smooth and successful CSV import process into NetSuite, follow these best practices and steps carefully. If you need expert assistance with your CSV imports or any other NetSuite-related services, BrokenRubik has the experience and professionals to help you streamline and customize your operations.
Ready to take your NetSuite processes to the next level? Contact us today, and let’s work together to achieve your business goals!
How BrokenRubik uses NetSuite to support tariff-affected businesses
How Yello! Turns your SuiteCommerce site into a content-driven growth machine
Content is still king: Why even B2B ecommerce needs a blog
5 Reasons why your Netsuite Ecommerce store needs a Blog
SuiteCommerce or Shopify? How to Choose the Right Platform for Your Business
5 Performance Fixes Every SuiteCommerce Site Should Apply Today
Why Your SuiteCommerce Site Might Feel Slow, And What to Do About It
Shopify + NetSuite Integration: Make It Work, Make It Scalable
CONTACT US

Let’s Talk!
Have a question, idea,
or project in mind?
Leave us a message below, we’d love to hear from you. Our team will get back to you shortly to explore how we can help.
CONTACT US
Let’s Talk!
Have a question, idea,
or project in mind?
Leave us a message below, we’d love to hear from you. Our team will get back to you shortly to explore how we can help.
CONTACT US
Let’s Talk!
Have a question, idea,
or project in mind?
Leave us a message below, we’d love to hear from you. Our team will get back to you shortly to explore how we can help.